
Backing Up Your Metadata
You may wish to keep a backup of all your Collection metadata - Tags, Ratings, Playcounts, and Manually Added Tracks. The ‘Metadata Backup’ panel allows you to this.
It will also back up all other unrecoverable database data - subscribed Podcasts, Radio Stations, Background Images, and Albums To Listen To. Note though that this only backs up the database - other files such as album art, downloaded podcasts, and background image files are not restored by this process.
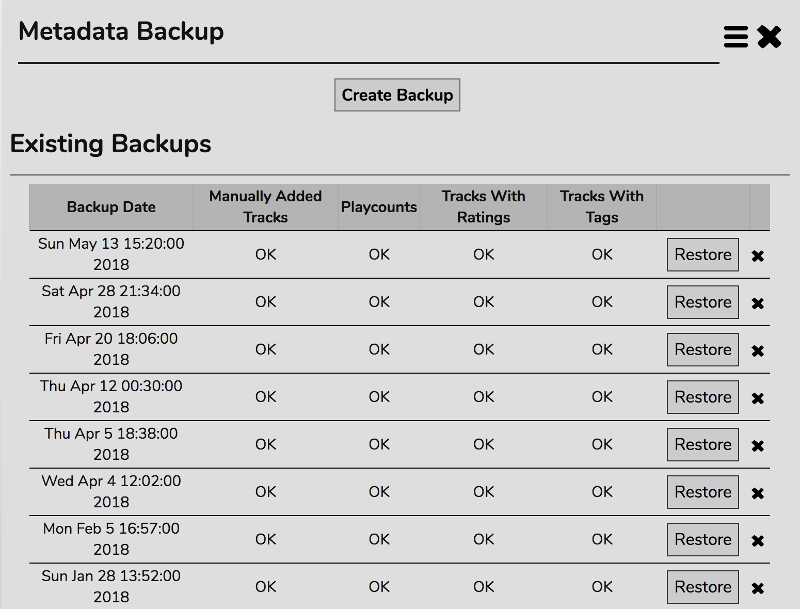
Click ‘Create Backup’ to create a new backup.
Click ‘Restore’ to restore the selected backup.
Click the X to delete a backup.
Automating The Process
You can automate the process of creating metadata backups by creating a cron job that runs
curl -d '[{"action": "metabackup"}]' -H "Content-Type: application/json" -X POST http://your.rompr.installation/api/metadata/backup/
Note that there is no limit to the number of backups that can be created, so you will need to manually delete old ones from time to time to prevent your hard drive filling up!
Transferring Metadata
You may want to transfer your metadata from one install to another. Perhaps you’re setting up a new installtion of RompЯ or you’re recreating your collection. You can do this, even if your local files are stored under a different directory structure.
You’ll need to copy the backup data from the old installation to the new one. It is stored in
rompr/prefs/databackups/
In there will be a separate, dated directory for each backup. Simply copy the folder you want into your new installation.
Restoring Metadata
Once you have the Metadata backup in place, you can restore it. If you’re restoring to a new database - perhaps you’re changing from MySQL to SQLite - and you have already downloaded all your album art, then you should first go to rompr/?setup and DISABLE the option to Delete Unused Album Art on Startup. Then click OK. If you have local music files you must now build your Music Collection in the normal way, then you can restore the backup. All metadata will be importted, and Podcasts, Radio stations, etc will be restored to the state they were in when the backup was taken. To restore your Album Art, open the Album Art Manager and click on Get Missing Covers - this will restore the database so it refers to the album art already downloaded. Finall return to rompr/?setup and re-enable the option you disabled earlier.
Backing Up Your Entire Database
You can also make a backup copy of your entire database - this will back up your entire collection, podcasts, and radio stations - but you’ll need to use the command line for this.
If You Use SQLite
Making A Backup Copy
The database file resides at
rompr/prefs/collection.sq3
You can simply make a copy of this file. Note that you probably won’t have write permission for the prefs directory, so for any file operations you will need to use sudo
sudo cp collection.sq3 collection_backup.sq3
Restoring The Backup
Simply replace your old database with your backup copy. It is very important that you also set the ownership of the new file to be the same as the old one. To find out what this is, first do
ls -l collection.sq3
-rw-r--r--  1 _www  staff  4734976 18 Jun 17:35 collection.sq3
In this example the file is owned by the user _www and the group staff, so to replace it with your backup do
sudo rm collection.sq3
sudo cp collection_backup.sq3 collection.sq3
sudo chown _www collection.sq3
sudo chgrp staff collection.sq3
These commands, in order do the following:
- Remove the rompr database
- Make a copy of the backup with the same name as the old database
- Change ownership of the new database to the user _www
- Change the group of the new database to the group staff
If You Use MySQL
Creating The Backup
You need to use the mysqldump tool. Change to the directory where you want to store the backup file and do
mysqldump -u [uname] -p[pass] [dbname] > [backupfile.sql]
Where
- [uname] is the username for your rompr database
- [pass] is the password for your rompr database
- [dbname] is the rompr database name
- [backupfile] is the filename of the backup
If you used the default options for rompr this would be
mysqldump -u rompr -promprdbpass romprdb > rompr_backup.sql
Note there is no space between -p and the password
Restoring The Backup
First, you need to delete and recreate the rompr database. Enter the password for your mysql root user when prompted;
mysql -u root -p
Enter password:
DROP DATABASE romprdb;
quit;
Now, follow the instructions for creating the MySQL database
Then simply import the backup file
mysql -u root -p romprdb < rompr_backup.sql
Again, enter your mysql root password when prompted